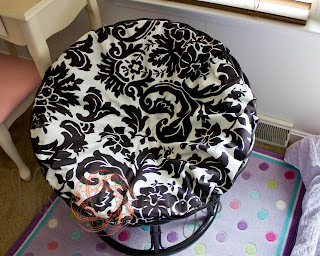
As I have said before, I am expecting a baby girl in just about three months and have two kiddos already, Max and Emma. Emma will be sharing a room with her new sister and we have been working our tushies off getting the rooms ready. I found this kids' papasan chair at a yard sale for $12! I thought it was the cutest little thing and when Emma sat in it, it fit like a glove! :-) SOLD!
I knew for sure that there would be a makeover in this baby's future...just wasn't sure WHO would be doing it. I am NOT a seamstress, I would love to learn, but I have no time at the moment to teach myself. I thought I would ask a friend or a family member to sew a new cover, but alas, my patience (or lack thereof) got the best of me and I just couldn't wait!
I bought some cool fabric from fabric.com and spray painted the base of the chair black. When the fabric came in and the girls' room was painted and ready for it, I took matters into my own hands. I used the "no-sew" hem material, you know the kind you place between two pieces of fabric and iron on. I admit, I wasn't sure how or if this would even work. But, I am elated to report that it worked fantastically. The package said it should last through multiple washes, so I am crossing my fingers that it can stand up to a 30 lb. princess and her baby sister. At least for a few years!
Here is the finished product...cute, huh? :-)
I laid the cushion on the fabric and cut around it, leaving a LOT of extra material (I can always cut off the excess later). Then I placed the outer sides of the fabric (the ones you see) together and pinned where I wanted to iron. I ironed the two pieces together, careful to leave a hole big enough to stuff the cushion in, turned the fabric right side out, put the cushion in and ironed the hem the rest of the way. Obviously, where I had to iron after placing the cushion in isn't as pretty as the rest, but you really can't tell with this papasan chair and the busy pattern of the fabric (I just sort of tucked the excess under.)


10 comments:
Looks SO much better :) Well done :)
I love a good papasan chair, and THIS is a good papasan chair! I love how you redid it. I am your newest follower. I would love it if you came over to Greetings From the Asylum and followed me too!
Turned out great! Cute fabric! I just found out about Stitch Witchery (the iron on stuff)and I LOVE it! Found you from Diamond in the Stuff.
Mallory
http://mallicious.blogspot.com/
it looks sooo much better! or should i say "no-sew" much better :) am currently working on extending the length in a pair of drapes using stitch witchery! it's a dream for non-sewers, isn't it? i would love if you shared this at my tip-toe thru tuesday party (open until friday)! http://crayonfreckles.blogspot.com/2011/05/1st-ever-tip-toe-thru-tuesday-party.html
Looks Great! I'm visiting from Women Who Do It all, and I'm your newest follower:) I love no-sew projects. I'd love for you to stop by my blog (absolutelylovingmylife.blogspot.com) to see some of my no-sew projects some time.
Lorrie @ The Victorian Rabbit said...Several times I have owned these kinds of chairs. But I have never seen one look so good.
WOW!! I have one of those papasan chairs in my daughter's room...hhhmmmmm you are giving me some awesome ideas!! Thanks for sharing!! I will definitely be redoing her chair!!
Hi, are you able to take the cover off to wash it, if you hemmed the whole thing?
I found this kids' papasan chair at a yard sale for $12! ... ipapasanchair.blogspot.com
Hello,
How much fabric did you need for this project?
Thank you!
Samantha
Post a Comment