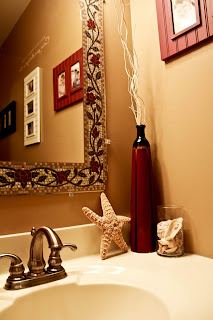
Back when we moved into our house, I WISH I would have taken before pictures of all of the projects, big and small, that we did. I have never been the person to remember that step, and heck, who knew I would be blogging about it years later? That being said, these pictures merely show you the after of the powder room formerly known as "blah."
Let me paint a picture for you in your head, shall I? Everything was builder-grade, sink, cabints, faucet (that really ugly shiny silver with the one plastic ball in the middle - picture public restrooms) and mirror. This was the first room in the house that we tackled, because let's face it, everyone was going to see our powder room!
The first task was painting over the ugly rosey purple color that would only be suitable for a little girl's room. Oh, I forgot one step, before we painted we had to peel the random seashells from the wall. I picked a warm brown for the room, because it was neutral and I could change decor as I chose (and believe me, I am infamous for changing decor, this is the probably the third makeover in this room in five years, but the paint color has stayed the same). The color is Burnt Almond by Behr and I love the way it compliments the hard wood in the room.
Next, we had to do something about the mirror and the vanity lights, both builder grade, both hideous. To my pleasant surprise, we found this fabulous mirror at Home Depot! Yes, I said Home Depot! I think it was around $40, so we snatched it up quickly. Next, the lighting...we just picked up the do it yourself kits at home depot and put it together and voila! The tinting on the lights gives it a nice warm look.
I don't have to say much about the faucet, it was horrible. Luckily, I have a handyman husband, so once I got this at the home depot, he had it installed in no time (he also installed the exact same one in our master bath, because it was just as hideous).
As for the cabinets, first I painted them an off-white, but I recently re-decorated and decided on this deep brown. When I polyurethaned, I made a mistake and used high-gloss instead of satin, but when all is said and done, I actually prefer that look in here (you can't really see it from the pictures). And, since the kids use this bathroom a lot, it will stand up to the wear and tear better! The finishing touch was changing out the seashell knobs with some simple brushed silver.
The red vase was a Dollar General find, I think I spent about $4 on it. The star fish I bought at one of my favorite places on earth, Stone Harbor, NJ (can't remember the cost, it's been too long). And, the seashells in the glass are compliments of a walk on the beach with the kids in SH. The frames you see reflected in the mirror were purchased at Christmas Tree Shoppe for about $3 a piece and I filled them with family photos we had taken on the beach two years ago. I know it's probably hard to see, but the two splurges I made in this room include the flip flop art under the pictures, found this at Christmas Tree Hill for $30 and the wall quote I bought from Uppercase Living for around $24, but I just love both of these in the room.
While I don't have exact numbers, this makeover cost me around $200 and made a BIG difference (again, wishing I had the "befores" to show you). It continues to be one of my favorite rooms
in our home.


5 comments:
Very nice! Love your mirror... so pretty!
Thanks for linking up to my Catch a Glimpse party!
I love how it came out. Great mirror. Thanks so much for linking up to my Swing into Spring party.
Beautiful room!! and wishing you the best with your blog!!
Beautiful photographs; calm and relaxing room!
Thanks for all of the wonderful comments...I am very new to blogging, so still learning. :-)
Post a Comment